Active Report 6 is a reporting tool for Silverlight, Windows forms and ASP.NET that will help you to make reports easier and faster. It gives newbies the confidance they need to create simple reports without spending unproductive, ramp-up hours. ActiveReports leverages the latest technologies including ActiveX, XML, ActiveScripting and CSS to provide you with full integration, open architecture, and a user-friendly interface. These include upgrade tools, MS Access and other report converters, the Visual Studio report designer, the end-user report designer, charts, bar codes, export plug-ins and the .NET reporting SDK. The “End user designer” allows end users to edit reports, save and load report layouts. It allows you to monitor and control the design environment and customize the report’s look and feel to meet the needs of your end users.
Installation:
- Select RUN from the Windows Start Menu.
- Type <setup file path>\SETUP.EXE.
- Click OK or press Enter to run the installation program.
- When prompted, enter your name, organization and serial number.
- Read the license agreement.
- Select your installation directory or accept the suggested default directory.
- Select the directory for the dll and ocx installation or accept the suggested default.
- Select the components you wish to install.
- Type the name of the program group or keep the default value.
- Click Next to proceed with the installation.
- The installation program copies all of the selected ActiveReports components to the specified directory and registers the control and DLLs in your system registry.
- You are now ready to use ActiveReports 2.
You also use End user designer which required some dll files and exe file will need to be placed under the same folder.
ActiveReports.Chart.dll, ActiveReports.CodeDomSerializer6.dll, ActiveReports.Design6.dll, ActiveReports.Document.dll, ActiveReports.Interop.dll,
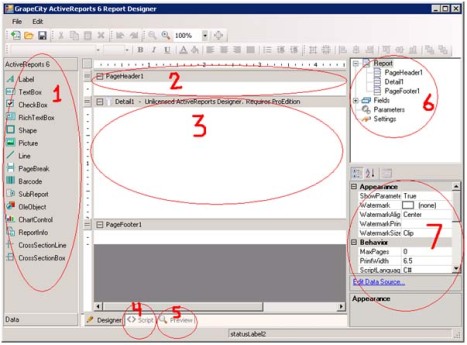
ActiveReports.Viewer6.dll, ActiveReports6.dll and EndUserDesigner.exe files. Double click the End user designer.exe file. The following Interface will open:
1. This is the list of controls available to the report design.
2. This is page header section which is displayed at the beginning of each report page. You can also add Report Section and Group sections. The Report section is displayed once at the beginning of the report. The Group sections are the ones used to regroup details as separate lists.
3. The Detail section corresponds to the position of the recordset pattern specified in the OLEDB, SQLDB or XML Data Source of the report.
4. This tab represents the code that the current RPX report design can execute. You can use VB script or C# script, set in the properties list of the report.
5. The Preview tab display the report output view.
6. This is the data information. It gives the possibilities to add directly fields to the report (2-3) designer. It gives also the access to the report general settings.
7. List of all the available properties of the current selection.
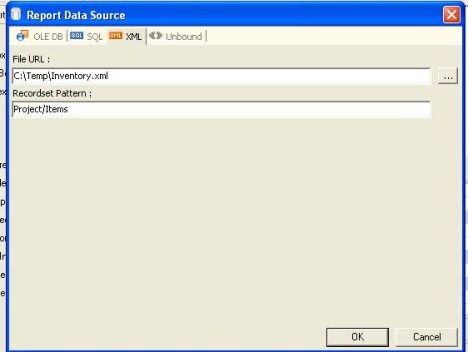
Now I describe how we design a new report using XML file as datasource. We use Inventory.xml file as datasource to design the sample report.
* Launch the End-User-Designer and click on the ‘File’ menu and select the New option or the ‘New’ icon from the toolbar.
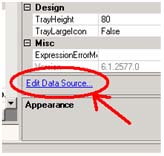
* Set the datasource: Select the Report node in the upper right control panel of the End-User Designer. This selection will assign the report properties of the report. Just below this list of properties, you will have access to a new link ‘Edit Data Source’.

Click on the link will prompt a dialog with datasource information as follows:
Now by clicking on the ‘Report’ on upper right box you can see ‘Field’ node. While expanding the node with click on the + sign you can access all required fields which you use to design the report. Just drag and drop the field into report section and click ‘Preview’ tab. You can see the report data. All the Group sections can have an Xml Path assign to indicate at which data change they need to be displayed. This Xml pattern can be found in the section property named “DataField”.
You have to set the report path from which the main report will get all sub reports to display. Take a textbox from toolbar and named it as ‘RptPath’. Now into its text property enter your report folder path like – “D:\WorkArea\Reports\Items”. Save the file as ‘MainItems.rpx’.
There are mandatory fields or values that need to be set for the report. we discuss it later.
Filed under: Active Report 6 | Tagged: Active Report 6, C++, Reporting Tools | 1 Comment »


