How to create CSV file from Active Report 6

A common requirement is to have applications share data with other programs. Although there are interfaces available to work with, for example, CSV files. A much simpler way to have your application share data is by reading and writing Comma-Separated Values (CSV) files. CSV files can easily be read and written by many programs, including Microsoft Excel.

Active Report 6 developers sometime needs to export report data to CSV file. Now we describe how to do it. We have Order Details Report. Supose we have some text fields into Details section and need to export the whole report data into a new CSV file named “OrderDetails.csv”. We use Active Report 6 with C# language support.

The “Orders.xml” file structure is:

<?xml version=”1.0″ encoding=”utf-8″?>
<Orders>
   <Order ID=”10248″>
 <Product>
     <Description>Queso Cabrales</Description>
     <Discount>0%</Discount>
     <UnitPrice>$14.00</UnitPrice>
     <Quantity>12</Quantity>
     <ExtendedPrice>$168.00</ExtendedPrice>
        </Product>
 <Product>
     <Description>Singaporean Hokkien Fried Mee</Description>
     <Discount>0%</Discount>
     <UnitPrice>$9.80</UnitPrice>
     <Quantity>10</Quantity>
     <ExtendedPrice>$98.00</ExtendedPrice>
        </Product>
 <Product>
     <Description>Mozzaralla of Giovanni</Description>
     <Discount>0%</Discount>
     <UnitPrice>$34.80</UnitPrice>
     <Quantity>5</Quantity>
     <ExtendedPrice>$174.00</ExtendedPrice>
        </Product>
   </Order>
   <Order ID=”10249″>
 <Product>
     <Description>Manjimup Dried Apples</Description>
     <Discount>0%</Discount>
     <UnitPrice>$42.40</UnitPrice>
     <Quantity>40</Quantity>
     <ExtendedPrice>$1696.00</ExtendedPrice>
        </Product>
 <Product>
     <Description>Tofu</Description>
     <Discount>0%</Discount>
     <UnitPrice>$18.60</UnitPrice>
     <Quantity>9</Quantity>
     <ExtendedPrice>$167.40</ExtendedPrice>
        </Product>
   </Order>
   <Order ID=”10250″>
 <Product>
     <Description>Manjimup Dried Apples</Description>
     <Discount>15%</Discount>
     <UnitPrice>$42.40</UnitPrice>
     <Quantity>35</Quantity>
     <ExtendedPrice>$1261.40</ExtendedPrice>
        </Product>
 <Product>
     <Description>Jack’sNewEnglandClean Chowder</Description>
     <Discount>0%</Discount>
     <UnitPrice>$7.70</UnitPrice>
     <Quantity>10</Quantity>
     <ExtendedPrice>$77.00</ExtendedPrice>
        </Product>
 <Product>
     <Description>Louisiana Fiery Hot Perrer Sauce</Description>
     <Discount>15%</Discount>
     <UnitPrice>$16.80</UnitPrice>
     <Quantity>15</Quantity>
     <ExtendedPrice>$214.20</ExtendedPrice>
        </Product>
   </Order>
   <Order ID=”10251″>
 <Product>
     <Description>Louisiana Fiery Hot Perrer Sauce</Description>
     <Discount>0%</Discount>
     <UnitPrice>$16.80</UnitPrice>
     <Quantity>20</Quantity>
     <ExtendedPrice>$336.00</ExtendedPrice>
        </Product>
 <Product>
     <Description>Gustafs Knackebrod</Description>
     <Discount>5%</Discount>
     <UnitPrice>$16.80</UnitPrice>
     <Quantity>6</Quantity>
     <ExtendedPrice>$95.70</ExtendedPrice>
        </Product>
 <Product>
     <Description>Ravidi Angelo</Description>
     <Discount>5%</Discount>
     <UnitPrice>$15.60</UnitPrice>
     <Quantity>15</Quantity>
     <ExtendedPrice>$222.30</ExtendedPrice>
        </Product>
   </Order>
   <Order ID=”10252″>
 <Product>
     <Description>Getost</Description>
     <Discount>5%</Discount>
     <UnitPrice>$2.00</UnitPrice>
     <Quantity>25</Quantity>
     <ExtendedPrice>$47.50</ExtendedPrice>
        </Product>
   </Order>
</Orders>

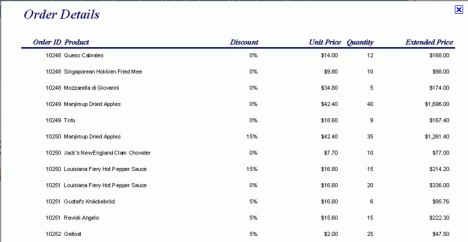
The report looks like:

OrderDetailsReport

To create csv file we have to implements the given steps:

1. Add the following line into class scope of the report:


using System.IO;

2. We add code into detail section of the report:

public void Detail_Format()
{
 //csv file OrderDetails
 string columnText = “”;
 string columnHeaderText = “”;
 //Header Text
 columnHeaderText = “Order ID” + ‘,’ + “Product” + ‘,’ + “Discount” + ‘,’ + “Unit Price” + ‘,’ + “Quantity” + ‘,’ + “Extended Price”;
 
 columnText = fldOrderId.Text + ‘,’ + fldProductDescription.Text + ‘,’ + fldDiscount.Text + ‘,’ + fldUnitPrice.Text + ‘,’ + fldQuantity.Text + ‘,’ + fldExtendedPrice.Text;


 string filename = “OrderDetails.csv”;
 StreamWriter sw = new StreamWriter(filename, true);
 //add Header to CSV
 if(bAddHeader == false)
 {
  sw.WriteLine(columnHeaderText);
  bAddHeader = true;
 }
 else
 {
  //Add order details
  sw.WriteLine(columnText);
 }
 sw.Close();
}

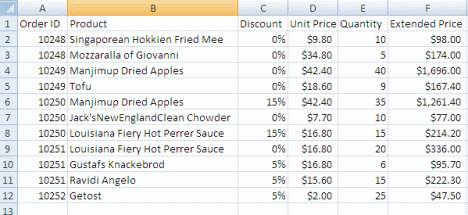
Now run the report or click on the “Preview” tab to view reports output. The “OrderDetails.csv” file is created into the application directory. The output file is looks like below:
 You can download source files from here

Show message from string table in C#

1. Run Microsoft Visual Studio 2010 and create a new windows application(File->New->Project)

2. Select Windows FormsApplication and enter application Name into Name field “TestMessage”

3.  Add a button from Toolbox, enter ‘Show Message’ into Text property, ‘btnShowMessage’ into Name property

4. Double click on the button to go to the class file

5. Add tow reference:

using  System.Resources;

using System.Reflection;

6. Go to the design view and right click on the project solution name in solution view, select Add->New Item, select Resource File and click on ‘Add’ button. A file named ‘Resource1.resx’ will add to your project

7. Double click on the resource file and enter “This is a test” into value field. default name field is String1. save the file

8. Add following code into Form1 class scope:

public partial class Form1 : Form
    {

        private static ResourceManager RM;
       
        public static void initialise()
        {
            Assembly assembly = Assembly.GetExecutingAssembly();
            RM = new ResourceManager(“TestMessage.Resource1”, assembly);
        }
        public static string Getstring(string key)
        {
            return RM.GetString(key);
        }

}

9. To initialize the file add following code into default constractor of the class:

public Form1()
        {
            InitializeComponent();
            initialise();

        }

10. Double click on the button and add the code:

private void btnShow_Click(object sender, EventArgs e)
        {
            MessageBox.Show(Getstring(“String1”));
        }

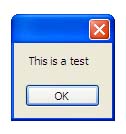
11. Compile and run the project, click on the button.It will display message from string table

How can you develop reports with Active Report 6

Active Report 6 is a reporting tool for Silverlight, Windows forms and ASP.NET that will help you to make reports easier and faster.  It gives newbies the confidance they need to create simple reports without spending unproductive, ramp-up hours. ActiveReports leverages the latest technologies including ActiveX, XML, ActiveScripting and CSS to provide you with full integration, open architecture, and a user-friendly interface. These include upgrade tools, MS Access and other report converters, the Visual Studio report designer, the end-user report designer, charts, bar codes, export plug-ins and the .NET reporting SDK. The “End user designer” allows end users to edit reports, save and load report layouts. It allows you to monitor and control the design environment and customize the report’s look and feel to meet the needs of your end users. 

Installation:

  • Select RUN from the Windows Start Menu.
  • Type <setup file path>\SETUP.EXE.
  • Click OK or press Enter to run the installation program.
  • When prompted, enter your name, organization and serial number.
  • Read the license agreement.
  • Select your installation directory or accept the suggested default directory.
  • Select the directory for the dll and ocx installation or accept the suggested default.
  • Select the components you wish to install.
  • Type the name of the program group or keep the default value.
  • Click Next to proceed with the installation.
  • The installation program copies all of the selected ActiveReports components to the specified directory and registers the control and DLLs in your system registry.
  • You are now ready to use ActiveReports 2.

You also use End user designer  which required some dll files and exe file will need to be placed under the same folder.

ActiveReports.Chart.dll, ActiveReports.CodeDomSerializer6.dll, ActiveReports.Design6.dll, ActiveReports.Document.dll, ActiveReports.Interop.dll,
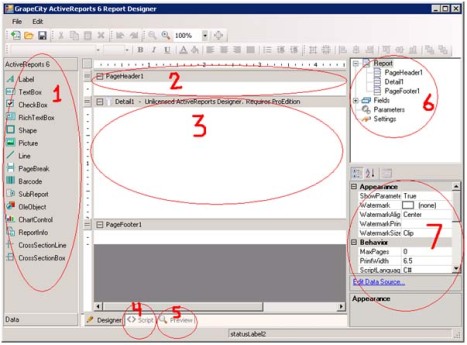
ActiveReports.Viewer6.dll, ActiveReports6.dll and EndUserDesigner.exe files. Double click the End user designer.exe file. The following Interface will open:

1. This is the list of controls available to the report design.

2. This is page header section which is displayed at the beginning of each report page. You can also add Report Section and Group sections. The Report section is displayed once at the beginning of the report. The Group sections are the ones used to regroup details as separate lists.

3. The Detail section corresponds to the position of the recordset pattern specified in the OLEDB, SQLDB or XML Data Source of the report.

4. This tab represents the code that the current RPX report design can execute. You can use VB script or C# script, set in the properties list of the report.

5. The Preview tab display the report output view.

6. This is the data information.  It gives the possibilities to add directly fields to the report (2-3) designer.  It gives also the access to the report general settings.

7.  List of all the available properties of the current selection.

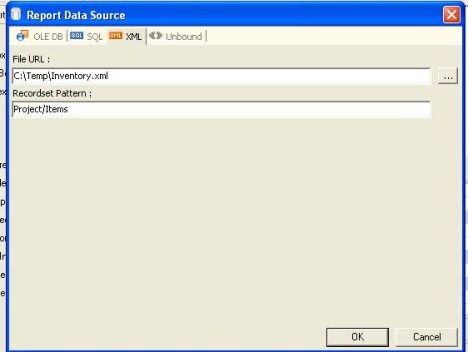
Now I describe how we design a new report using XML file as datasource.  We use Inventory.xml file as datasource to design the sample report.

* Launch the End-User-Designer and click on the ‘File’ menu and select the New option or the ‘New’ icon from the toolbar.   

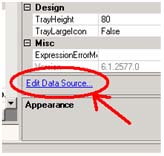
* Set the datasource: Select the Report node in the upper right control panel of the End-User Designer. This selection will assign the report properties of the report. Just below this list of properties, you will have access to a new link ‘Edit Data Source’.


Click on the link will prompt a dialog with datasource information as follows:

Now by clicking on the ‘Report’ on upper right box you can see ‘Field’ node. While expanding the node with click on the + sign you can access all required fields which you use to design the report. Just drag and drop the field into report section and click ‘Preview’ tab. You can see the report data.  All the Group sections can have an Xml Path assign to indicate at which data change they need to be displayed.  This Xml pattern can be found in the section property named “DataField”.

You have to set the report path from which the main report will get all sub reports to display. Take a textbox from toolbar and named it as ‘RptPath’. Now into its text property enter your report folder path like – “D:\WorkArea\Reports\Items”. Save the file as ‘MainItems.rpx’.

There are mandatory fields or values that need to be set for the report.  we discuss it later.

How to display Flash animation in Visual C++ 6

Wanna display flash swf movie file in your VC++ application. Dont worry! Here I give the steps below:

1. Start Visual C++ 6.0 wizard, select type and name of new MFC application project: FlashViewer. Click OK to start MFC Application Wizard:

2. Select Dialog based project type and click Next. Next page will appear:

3. Select aboutbox, 3d control and ActiveXControls and Click Finish to create new project. Visual C++ IDE will display summary information for new project: Click OK to open new dialog based project in VC++ IDE:

Now we have to import Shockwave ActiveX control to controls toolbar to display flash file in our application.

4. Go to Project menu, select Add To Project sub-menu and then click Components and Controls command: Visual C++ will display “Components and Controls Gallery” dialog.

5. Click on “Registered ActiveX Controls” to display list of available ActiveX controls:

6. Find and select Shockwave Flash Object ActiveX control in the list of available controls and click “Insert” to add this control to controls toolbar.

Registered ActiveX controls

VC will generate special C++ class that will help to interact with this control:

7. Click OK and VC will generate new “CShockwaveFlash” class in ShockwaveFlash.cpp and ShockwaveFlash.h files.

8. “Shockwave Flash Object” control will appear on controls toolbar:

9. Click on “Shockwave Flash Object” icon and then click on dialog form. Answer “OK” to add new component to dialog:

Confirmation message box

10. New control will be added. Now we will add dialog class member that will handle Flash control. Right-click on dialog and select “Class Wizard” to invoke Class Wizard:

11. Class Wizard dialog will appear. Select Member Variables tab and click Add Variable… button to add new variable:

Enter name of new varaible: m_FlashPlayer and click OK:

Add Member dialog

12. Now click OK to close MFC ClassWizard.

Now we will place code that will load “nightFall.swf” into flash player control.

13. Right-click on dialog form and select “Events..” to invoke Events dialog:Select and double-click on WM_INITDIALOG caption.

14. Code Editor window will appear. CDisplayFlashDlg::OnInitDialog() function is responsible for handling initialization code so we will add our code here.

Add this line below // TODO: Add extra initialization here:

m_FlashPlayer.SetMovie(“c:\NightFall.swf”);

15. Run application by pressing F5 or using Build menu:

You will see application that will display NightFall.SWF flash movie using Shockwave Flash Object ActiveX control:

You can download the source code of this example here:

Design Pattern – Part 1

In software engineering, a design pattern is a general reusable solution to a commonly occurring problem in software design. A design pattern is not a finished design that can be transformed directly into code. It is a description or template for how to solve a problem that can be used in many different situations. Object-oriented design patterns typically show relationships and interactions between classes or objects, without specifying the final application classes or objects that are involved.

Patterns originated as an architectural concept by Christopher Alexander (1977/79). In 1987, Kent Beck and Ward Cunningham began experimenting with the idea of applying patterns to programming and presented their results at the OOPSLA conference that year. Design patterns gained popularity in computer science after the book Design Patterns: Elements of Reusable Object-Oriented Software was published in 1994.

Classification:

Design Patterns originally grouped design patterns into the categories Creational Patterns, Structural Patterns, and Behavioral Patterns, and described them using the concepts of delegation, aggregation, and consultation.

Creational patterns

These patterns have to do with class instantiation. They can be further divided into class-creation patterns and object-creational patterns. While class-creation patterns use inheritance effectively in the instantiation process, object-creation patterns use delegation to get the job done.

  • Abstract Factory groups object factories that have a common theme.
  • Builder constructs complex objects by separating construction and representation.
  • Factory Method creates objects without specifying the exact class to create.
  • Prototype creates objects by cloning an existing object.
  • Singleton restricts object creation for a class to only one instance.

Structural patterns

These concern class and object composition. They use inheritance to compose interfaces and define ways to compose objects to obtain new functionality.

  • Adapter allows classes with incompatible interfaces to work together by wrapping its own interface around that of an already existing class.
  • Bridge decouples an abstraction from its implementation so that the two can vary independently.
  • Composite composes one-or-more similar objects so that they can be manipulated as one object.
  • Decorator dynamically adds/overrides behaviour in an existing method of an object.
  • Facade provides a simplified interface to a large body of code.
  • Flyweight reduces the cost of creating and manipulating a large number of similar objects.
  • Proxy provides a placeholder for another object to control access, reduce cost, and reduce complexity.

Behavioral patterns

These design patterns are about classes objects communication. They are specifically concerned with communication between objects.

  • Chain of responsibility delegates commands to a chain of processing objects.
  • Command creates objects which encapsulate actions and parameters.
  • Interpreter implements a specialized language.
  • Iterator accesses the elements of an object sequentially without exposing its underlying representation.
  • Mediator allows loose coupling between classes by being the only class that has detailed knowledge of their methods.
  • Memento provides the ability to restore an object to its previous state (undo).
  • Observer is a publish/subscribe pattern which allows a number of observer objects to see an event.
  • State allows an object to alter its behavior when its internal state changes.
  • Strategy allows one of a family of algorithms to be selected on-the-fly at runtime.
  • Template method defines the skeleton of an algorithm as an abstract class, allowing its subclasses to provide concrete behavior.
  • Visitor separates an algorithm from an object structure by moving the hierarchy of methods into one object.

Concurrency patterns

Active Object: The Active Object design pattern decouples method execution from method invocation that reside in their own thread of control. The goal is to introduce concurrency, by using asynchronous method invocation and a scheduler for handling requests.

Balking: The Balking pattern is a software design pattern that only executes an action on an object when the object is in a particular state.

Double checked locking : Double-checked locking is a software design pattern also known as “double-checked locking optimization”. The pattern is designed to reduce the overhead of acquiring a lock by first testing the locking criterion (the ‘lock hint’) in an unsafe manner; only if that succeeds does the actual lock proceed.

The pattern, when implemented in some language/hardware combinations, can be unsafe. It can therefore sometimes be considered to be an anti-pattern.

Guarded In concurrent programming, guarded suspension is a software design pattern for managing operations that require both a lock to be acquired and a precondition to be satisfied before the operation can be executed.

Monitor object A monitor is an approach to synchronize two or more computer tasks that use a shared resource, usually a hardware device or a set of variables.

Read write lock A read/write lock pattern or simply RWL is a software design pattern that allows concurrent read access to an object but requires exclusive access for write operations.

Scheduler The scheduler pattern is a software design pattern. It is a concurrency pattern used to explicitly control when threads may execute single-threaded code.

Thread pool In the thread pool pattern in programming, a number of threads are created to perform a number of tasks, which are usually organized in a queue. Typically, there are many more tasks than threads.

Thread-specific storage Thread-local storage (TLS) is a computer programming method that uses static or global memory local to a thread.

Reactor The reactor design pattern is a concurrent programming pattern for handling service requests delivered concurrently to a service handler by one or more inputs. The service handler then demultiplexes the incoming requests and dispatches them synchronously to the associated request handlers.

Working with GDI+ – Part 1

While working on my C++ projects I have to use GDI+ to handle graphics objects. Here I describe about GDI+ and how we can use it to our projects.

What is GDI+?

Microsoft Windows GDI+ is a class-based API for C/C++ programmers to develop all windows based applications. Applications based on the Microsoft Win32 API do not do not access graphics hardware directly. GDI+ interacts with device drivers on behalf of applications. It enables applications to use graphics and formatted text on both the video display and the printer. GDI+ is also supported by Microsoft Win64.

The services of Microsoft Windows GDI+ fall into the following three broad categories:

2-D vector graphics

Imaging

Typography

2-D vector graphics

It helps developers to drawing primitives such as lines, curves and figures which are specified by sets of points on a coordinate system. GDI+ provides classes that store information about the primitives themselves, classes that store information about how the primitives are to be drawn, and classes that actually do the drawing. For example, the Rect class stores the location and size of a rectangle; the Pen class stores information about line color, line width, and line style; and the Graphics class has methods for drawing lines, rectangles, paths, and other figures. There are also several Brush classes that store information about how closed figures and paths are to be filled with colors or patterns.

Imaging

Any kind of pictures and digital images are stored as bitmaps, arrays of numbers which represent the colors of individual dots on the screen. So data structures that store information about bitmaps are more complex and GDI+ has several classes to provide that kind of services.

Typography

Typography is concerned with the display of text in a variety of fonts, sizes, and styles. GDI+ provides an impressive amount of support for this complex task. One of the new features in GDI+ is sub-pixel anti-aliasing, which gives text rendered on an LCD screen a smoother appearance.

The Structure of GDI+

The C++ interface to Microsoft Windows GDI+ contains about 40 classes, 50 enumerations, and 6 structures. There are also a few functions that are not members of any class. The Graphics class is the core of the GDI+ interface; it is the class that actually draws lines, curves, figures, images, and text.

Graphics class has methods to drawing objects as and when required. For example, the Graphics::DrawLine method receives a pointer to a Pen object, which holds attributes (color, width, dash style, and the like) of the line to be drawn. The Graphics::FillRectangle method can receive a pointer to a LinearGradientBrush object, which works with the Graphics object to fill a rectangle with a gradually changing color.

Many classes work together with the Graphics class. Like rect, point, size, BitmapData, Bitmap etc. Rect, Point and Size class serve general purpose and Others are for specialized purposes and considered as helper classes.

GDI+ defines several enumerations, which are collections of related constants. For example, the LineJoin enumeration used to join two lines. It contain three elements which specify line join styles- LineJoinBevel, LineJoinMeter and LineJoinRound.

GDI+ provides a few functions that are not part of any class. Two of those functions are GdiplusStartup and GdiplusShutdown. You must call GdiplusStartup before you make any other GDI+ calls, and you must call GdiplusShutdown when you have finished using GDI+.

Lets start working:

1. Install the latest Microsoft SDK which contain GDI+ header file and prepared a directory with all the GDI+ headers. Keep it within your application folder.

Go to Project->Settings->Link from main menu

remove Debug/ from output filename field to keep exe file into application path:

ImageViewer.exe

Enter following line into Object/library module field:

GDIPlus\gdiplus.lib

now press Ok button

2. Add the following code into StdAfx.h file

#include “GDIPlus/GBGdiPlus.h”
using namespace Gdiplus;

3. Download gdiplus.dll and paste it to your application folder(The safest place to put it in the same directory as your executeble).

Click here to go to the download of gdiplus.dll

4. add code to your projects App files :

#include “stdafx.h”
#include “ImageViewer.h”
#include “ImageViewerDlg.h”

#ifdef _DEBUG
#define new DEBUG_NEW
#undef THIS_FILE
static char THIS_FILE[] = __FILE__;
#endif

ULONG_PTR GDIPlusToken;

///////////////////////////

BOOL ImageViewerApp::InitInstance()
{

if (!AfxSocketInit())
{
AfxMessageBox(IDP_SOCKETS_INIT_FAILED);
return FALSE;
}

AfxEnableControlContainer();

//begin: initialize GDI+
GdiplusStartupInput GDIPlusStartupInput;
VERIFY(GdiplusStartup( &GDIPlusToken, &GDIPlusStartupInput, NULL ) == Ok );
//end: initialize GDI+

return FALSE;

}

int ImageViewerApp::ExitInstance()
{
// TODO: Add your specialized code here and/or call the base class
//begin: shutdown GDI+
GdiplusShutdown(GDIPlusToken);
//end: shutdown GDI+

return CWinApp::ExitInstance();
}

Now GDI+ is ready to work with your project.

To test it you may add some code within paint function of your dialog

void ImageViewerDlg::OnPaint()
{
CPaintDC dc(this);
Graphics graphics(dc);
{
Pen pen1(Color(255, 255, 255), 400);
graphics.DrawLine(&pen1, 200, 0, 200, 400);
}

{
Pen pen1(Color(0, 0, 0), 10);
graphics.DrawLine(&pen1, 133, 0, 137, 400);
}

graphics.SetSmoothingMode(SmoothingModeAntiAlias);

{
Pen pen1(Color(0, 0, 0), 10);
graphics.DrawLine(&pen1, 266, 0, 270, 400);
}
}

5. Compile and run the project. display two virticle line in your dialog.