Posted on June 3, 2009 by afruj
Today while start working in an existing project which actually developed in windows, its all links are not working. So, first I have to set virtual host in leopard and place .htaccess file in my project root public_html folder. Then try to browse through all image buttons, but it didn’t work. We check mod-rewrite option, it didn’t works for our project. So I have to add following lines into /etc/httpd.conf file:
<Directory “/Applications/XAMPP/xamppfiles/htdocs/myproject.com/public_html”>
Options FollowSymLinks
AllowOverride All
#XAMPP
#Order deny,allow
#Deny from all
</Directory>
here myproject.com is my project folder name. Now I can browse again through all buttons.
Filed under: Uncategorized | Tagged: leopard, mac, mod-rewrite | 3 Comments »
Posted on June 3, 2009 by afruj
Posted on April 21, 2009 by afruj
In leopard 10.5 while u have to work with sqlite3 database u need to add the framework library to ur iPhone project. The framework path for libSqlite3.0 dylib is:
System->developer->platform->iPhone Simulator->developer->SDKs-> iPhoneSimulator 2.2 sdk->user->lib->
Filed under: Uncategorized | Tagged: iPhone, sqlite3 Framework path | Leave a comment »
Posted on April 7, 2009 by afruj

MesaSQLite is a tool design for sqlite3 in Macbook as phpmyadmin works for mysql. MesaSQLite makes creating, designing, and altering an SQLite3 database easy. We also use it to edit, summarize, and analyze data for ourselves and clients. Although we build new databases most days, we spend more of our time viewing and editing data.MesaSQLite uses the SQLite3 database engine. Here is an overview of MesaSQLite features:
1. Connections
2. Structure
3. Viewing and Editing Content
4. Special Queries
5. Forerign Keys
6. Exporting and Importing Data
REQUIREMENTS
Mac OS X 10.2 or later
DOWNLOAD NOW (7.8 MB)
Filed under: iPhone, Macbook OS | Tagged: Macbook, MesaSQLite, sqlite3 | Leave a comment »
Posted on April 2, 2009 by afruj
Install XAMPP:At first u have to download XAMPP for Mac OS X from this link and install as per their suggestion:http://www.apachefriends.org/en/xampp-macosx.html
installing XDebug on Mac OS X’s default PHP installation:
1. You are going to need to download the source code from the XDebug website. (I suggest into your “Downloads” folder to make the rest of the process easier.
2. Unzip the archive from the finder.
3. Open up the Terminal, paste the following command in and hit enter: cd ~/Downloads/xdebug-2.0.3/xdebug-2.0.3/
4. Do the same for this command: phpize
5. This one too: MACOSX_DEPLOYMENT_TARGET=10.5 CFLAGS=”-arch ppc -arch ppc64 -arch i386 -arch x86_64 -g -Os -pipe -no-cpp-precomp” CCFLAGS=”-arch ppc -arch ppc64 -arch i386 -arch x86_64 -g -Os -pipe” CXXFLAGS=”-arch ppc -arch ppc64 -arch i386 -arch x86_64 -g -Os -pipe” LDFLAGS=”-arch ppc -arch ppc64 -arch i386 -arch x86_64 -bind_at_load” ./configure –enable-xdebug
6. And finally this one: make
7. We have just compiled the xdebug module. We now need to copy the compiled file binary file into a place where PHP can find it. From the terminal (again) run the following command: cp modules/xdebug.so /usr/lib/php/extensions/no-debug-non-zts-20060613/
8. Finally we need to edit the /etc/php.ini file so that PHP is aware of the new module. From the terminal run this command: open /etc/. This will open the /etc folder in the Finder allowing you to right-click on the php.ini file and open it in your preferred text-editor (TextEdit or TextMate for example).
9. At the very bottom of that file add the following:
zend_extension=/usr/lib/php/extensions/no-debug-non-zts-20060613/xdebug.so
xdebug.file_link_format = “txmt://open?url=file://%f&line=%l”
xdebug.remote_enable=1
xdebug.remote_host=localhost
xdebug.remote_port=9000
xdebug.remote_autostart=1
10. In the terminal, for the last time (I promise), run the command: apachectl restart or simply restart your computer.
Now for installation test create a PHP script with a pile of errors in it and you should see colourful error messages when run in a browser (as apposed to plain old black and white text). Or you can download something like MacGDBp – a native debugging application for the Mac.
Filed under: Macbook OS, PHP | Tagged: Install XAMPP for Macbook, Xdebug | 1 Comment »
Posted on March 29, 2009 by afruj
While working suddenly firefox browser became hang. Even there was no way to go to another tab. The program was not responding. So I solved the problem in following ways:
1. Click on Finder icon in taskbar
2. Go to System->applications->Utilities
3. Click on Activity Monitor and select on the tasks which are not responding
4. click ‘Quit process’ and finally close the window.
Filed under: Macbook OS | Tagged: Activity monitor, application hanging, Macbook | 2 Comments »
Posted on March 28, 2009 by afruj
Ekushey provide the first Unicode Bangla solution for Mac OS X. page link is http://ekushey.org/?page/osx
Download and install font from the link.
Filed under: OS | Tagged: Bangla font, Macbook | 2 Comments »
Posted on March 28, 2009 by afruj
1.Open mozila firefox browser
2.From Tools menu, select Options.
3.From this Options window, click on Contents.
4. Click on Advanced button in Fonts & Colors section.

5. Click on the drop down list for option Fonts For. Select Bengali from this list.
6. Complete all the option fields as in the following image (you may choose your any favourite Bangla font) and then click on OK.
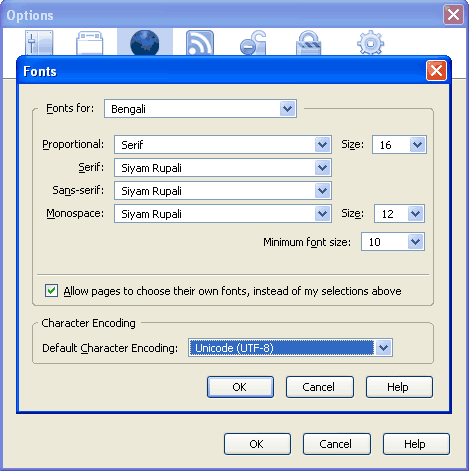
Now your configuration complete.
Filed under: Uncategorized | Tagged: Bengali Font, Configure, Mozilla Firefox | 10 Comments »
Posted on March 25, 2009 by afruj
This post is for windows users who switch to Macbook recent and wanna use previous keyboard shortcut as soon as possible. Should be follow the steps:
1. Click on System Preference in taskbar
2. click on keyboard and mouse icon
3. click on modifier keys
4. set Control(^) key to command
5. click OK to finish the job
Now u can work as easily. No need to change behavior. Happy programing.
Filed under: Uncategorized | Tagged: Keyboard shortcut, Macbook | 1 Comment »
Posted on March 24, 2009 by afruj


