Bangali Web design tutorials

Hello Academy's Profile Photo
Hello Academy  provide free web design tutorials in bangali language.  Anybody who doesn’t have any programming language knowledge can now develop web site easily with those tutorials. Here I add those YouTube links step by steps:

Basic web design:

1. গল্পে গল্পে ওয়েব ডিজাইনের ১ম পর্ব (ওয়েব ডিজাইনের শুরুর গল্প)

2. গল্পে গল্পে ওয়েব ডিজাইনের ২য় পর্ব (ওয়েব ডিজাইনের হাতেখড়ি-১ )

3. গল্পে গল্পে ওয়েব ডিজাইনের ৩য় পর্ব (ওয়েব ডিজাইনের হাতেখড়ি-১ )

4.গল্পে গল্পে ওয়েব ডিজাইনের ৪থ পর্ব (ওয়েব ডিজাইনের হাতেখড়ি-২ )

5.গল্পে গল্পে ওয়েব ডিজাইনের ৫ম পর্ব (ওয়েব ডিজাইনের হাতেখড়ি-৩ )

6.গল্পে গল্পে ওয়েব ডিজাইনের ৬ষঠ পর্ব (কমেন্টস এর গল্প )

7.গল্পে গল্পে ওয়েব ডিজাইনের ৭ম পর্ব (রেস্পন্সিভ এর গল্প )

PSD to HTML Basic:

8. গল্পে গল্পে ওয়েব ডিজাইনের ৮ম পর্ব (Psd to Html করার সাহসী গল্প part-1)

9. গল্পে গল্পে ওয়েব ডিজাইনের ৯ম পর্ব (Psd to Html করার সাহসী গল্প part-2)

10. গল্পে গল্পে ওয়েব ডিজাইনের ১০ম পর্ব (Psd to Html করার সাহসী গল্প part-3)

11. গল্পে গল্পে ওয়েব ডিজাইনের ১১তম পর্ব (Psd to Html করার সাহসী গল্প part-4)

12. গল্পে গল্পে ওয়েব ডিজাইনের ১২তম পর্ব (Psd to Html করার সাহসী গল্প part-5)

13. গল্পে গল্পে ওয়েব ডিজাইনের ১৩তম পর্ব (Psd to Html করার সাহসী গল্প part-6)

14. গল্পে গল্পে ওয়েব ডিজাইনের ১৪ তম পর্ব (রেস্পন্সিভ part-7)

Bootstrap basic:

১/ বুটিসট্র্যাপ বেসিক টিউটোরিয়াল ১ম পর্ব (প্রাথমিক ধারণা)

২/ বুটিসট্র্যাপ বেসিক টিউটোরিয়াল ২য় পর্ব (ড্রপডাউন মেন্যু)

৩/ বুটিসট্র্যাপ বেসিক টিউটোরিয়াল ৩য় পর্ব (স্লাইডার)

৪/ বুটিসট্র্যাপ বেসিক টিউটোরিয়াল ৪র্থ পর্ব (accordion)

Web Design Advance with Bootstrap-PSD to HTML with Bootastrap:

১/ বুটিসট্র্যাপ দিয়ে PSD to HTML (১ম পর্ব)

২/ বুটিসট্র্যাপ দিয়ে PSD to HTML (২য় পর্ব)

৩/ বুটিসট্র্যাপ দিয়ে PSD to HTML (৩য় পর্ব)

৪/ বুটিসট্র্যাপ দিয়ে PSD to HTML (৪র্থ পর্ব)

৫/ বুটিসট্র্যাপ দিয়ে PSD to HTML (৫ম পর্ব)

৬/ বুটিসট্র্যাপ দিয়ে PSD to HTML (৬ষ্ঠ পর্ব)

৭/ বুটিসট্র্যাপ দিয়ে PSD to HTML (৭ম পর্ব)

৮/ বুটিসট্র্যাপ দিয়ে PSD to HTML (৮ম পর্ব)

৯/ বুটিসট্র্যাপ দিয়ে PSD to HTML (৯ম পর্ব)

১০/ বুটিসট্র্যাপ দিয়ে PSD to HTML (১০ম পর্ব)

১১/ বুটিসট্র্যাপ দিয়ে PSD to HTML (১১তম পর্ব)

১২/ বুটিসট্র্যাপ দিয়ে PSD to HTML (১২তম পর্ব)

jQuery basic:

1/জেকুএরির ১ম পর্ব

2/জেকুএরির ২য় পর্ব

3/জেকুএরির ৩য় পর্ব

4/জেকুএরির ৪থ পর্ব

5/জেকুএরির ৫ম পর্ব

6/জেকুএরির ৬ষঠ  পর্ব

 7/জেকুএরির ৭ম  পর্ব

PHP Basic:

১/ PHP ১ম পর্ব (Introduction)

২/ PHP ২য় পর্ব (Data Types & Variables)

৩/ PHP ৩য় পর্ব (Arithmatic Operatos)

৪/ PHP ৪র্থ পর্ব (Assignment operator)

৫/ PHP ৫ম পর্ব (Logical Operator-1)

৬/ PHP ৬ষ্ঠ পর্ব (Logical Operator-2)

৭ / PHP ৭ম পর্ব (Index Array)

৮/ PHP ৮ম পর্ব (Associative Array)

৯/ PHP ৯ম পর্ব (Multidimensional Array)

১০/ PHP ১০ম পর্ব (For loop)

১১/ PHP ১১তম পর্ব (While loop)

১২ / PHP ১২তম পর্ব (Foreach loop)

How to create CSV file from Active Report 6

A common requirement is to have applications share data with other programs. Although there are interfaces available to work with, for example, CSV files. A much simpler way to have your application share data is by reading and writing Comma-Separated Values (CSV) files. CSV files can easily be read and written by many programs, including Microsoft Excel.

Active Report 6 developers sometime needs to export report data to CSV file. Now we describe how to do it. We have Order Details Report. Supose we have some text fields into Details section and need to export the whole report data into a new CSV file named “OrderDetails.csv”. We use Active Report 6 with C# language support.

The “Orders.xml” file structure is:

<?xml version=”1.0″ encoding=”utf-8″?>
<Orders>
   <Order ID=”10248″>
 <Product>
     <Description>Queso Cabrales</Description>
     <Discount>0%</Discount>
     <UnitPrice>$14.00</UnitPrice>
     <Quantity>12</Quantity>
     <ExtendedPrice>$168.00</ExtendedPrice>
        </Product>
 <Product>
     <Description>Singaporean Hokkien Fried Mee</Description>
     <Discount>0%</Discount>
     <UnitPrice>$9.80</UnitPrice>
     <Quantity>10</Quantity>
     <ExtendedPrice>$98.00</ExtendedPrice>
        </Product>
 <Product>
     <Description>Mozzaralla of Giovanni</Description>
     <Discount>0%</Discount>
     <UnitPrice>$34.80</UnitPrice>
     <Quantity>5</Quantity>
     <ExtendedPrice>$174.00</ExtendedPrice>
        </Product>
   </Order>
   <Order ID=”10249″>
 <Product>
     <Description>Manjimup Dried Apples</Description>
     <Discount>0%</Discount>
     <UnitPrice>$42.40</UnitPrice>
     <Quantity>40</Quantity>
     <ExtendedPrice>$1696.00</ExtendedPrice>
        </Product>
 <Product>
     <Description>Tofu</Description>
     <Discount>0%</Discount>
     <UnitPrice>$18.60</UnitPrice>
     <Quantity>9</Quantity>
     <ExtendedPrice>$167.40</ExtendedPrice>
        </Product>
   </Order>
   <Order ID=”10250″>
 <Product>
     <Description>Manjimup Dried Apples</Description>
     <Discount>15%</Discount>
     <UnitPrice>$42.40</UnitPrice>
     <Quantity>35</Quantity>
     <ExtendedPrice>$1261.40</ExtendedPrice>
        </Product>
 <Product>
     <Description>Jack’sNewEnglandClean Chowder</Description>
     <Discount>0%</Discount>
     <UnitPrice>$7.70</UnitPrice>
     <Quantity>10</Quantity>
     <ExtendedPrice>$77.00</ExtendedPrice>
        </Product>
 <Product>
     <Description>Louisiana Fiery Hot Perrer Sauce</Description>
     <Discount>15%</Discount>
     <UnitPrice>$16.80</UnitPrice>
     <Quantity>15</Quantity>
     <ExtendedPrice>$214.20</ExtendedPrice>
        </Product>
   </Order>
   <Order ID=”10251″>
 <Product>
     <Description>Louisiana Fiery Hot Perrer Sauce</Description>
     <Discount>0%</Discount>
     <UnitPrice>$16.80</UnitPrice>
     <Quantity>20</Quantity>
     <ExtendedPrice>$336.00</ExtendedPrice>
        </Product>
 <Product>
     <Description>Gustafs Knackebrod</Description>
     <Discount>5%</Discount>
     <UnitPrice>$16.80</UnitPrice>
     <Quantity>6</Quantity>
     <ExtendedPrice>$95.70</ExtendedPrice>
        </Product>
 <Product>
     <Description>Ravidi Angelo</Description>
     <Discount>5%</Discount>
     <UnitPrice>$15.60</UnitPrice>
     <Quantity>15</Quantity>
     <ExtendedPrice>$222.30</ExtendedPrice>
        </Product>
   </Order>
   <Order ID=”10252″>
 <Product>
     <Description>Getost</Description>
     <Discount>5%</Discount>
     <UnitPrice>$2.00</UnitPrice>
     <Quantity>25</Quantity>
     <ExtendedPrice>$47.50</ExtendedPrice>
        </Product>
   </Order>
</Orders>

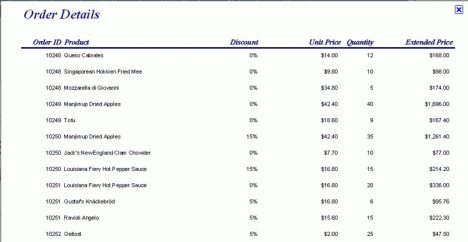
The report looks like:

OrderDetailsReport

To create csv file we have to implements the given steps:

1. Add the following line into class scope of the report:


using System.IO;

2. We add code into detail section of the report:

public void Detail_Format()
{
 //csv file OrderDetails
 string columnText = “”;
 string columnHeaderText = “”;
 //Header Text
 columnHeaderText = “Order ID” + ‘,’ + “Product” + ‘,’ + “Discount” + ‘,’ + “Unit Price” + ‘,’ + “Quantity” + ‘,’ + “Extended Price”;
 
 columnText = fldOrderId.Text + ‘,’ + fldProductDescription.Text + ‘,’ + fldDiscount.Text + ‘,’ + fldUnitPrice.Text + ‘,’ + fldQuantity.Text + ‘,’ + fldExtendedPrice.Text;


 string filename = “OrderDetails.csv”;
 StreamWriter sw = new StreamWriter(filename, true);
 //add Header to CSV
 if(bAddHeader == false)
 {
  sw.WriteLine(columnHeaderText);
  bAddHeader = true;
 }
 else
 {
  //Add order details
  sw.WriteLine(columnText);
 }
 sw.Close();
}

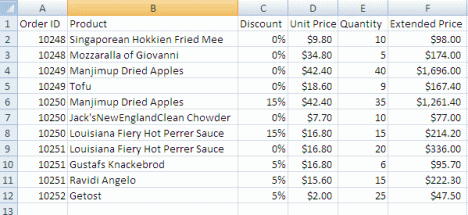
Now run the report or click on the “Preview” tab to view reports output. The “OrderDetails.csv” file is created into the application directory. The output file is looks like below:

 You can download source files from here

Create dynamic checklistbox using xsl

When we use database we design Item table like following:

ID Name Description Price Per Unit Batter Topping Quantity
0001 Cake Chocolate Cake 0.55 Regular Maple 100
0002 Cake Blueberry Cake 0.55 Blueberry Maple 200
0003 Raised Raised Glazed 0.55 Regular Glazed 150
0004 Buttermilk Chocolate Buttermilk 1.55 Chocolate   180
0005 Bar Chocolate Bar 0.75 Regular Maple 100

The XML file structure looks like this:

<?xml version=”1.0″ encoding=”utf-8″?>
   <Item>
        <ID><![CDATA[0001]]></ID>
        <Name>Cake</Name>
        <Description><![CDATA[Chocolate Cake]]></Description>
        <PricePerUnit>0.55</PricePerUnit>
        <Batter>Regular</Batter>
        <Topping><![CDATA[Maple]]></Topping>
        <Quantity>100</Quantity>
   </Item>
   <Item>
        <ID><![CDATA[0002]]></ID>
        <Name>Cake</Name>
        <Description><![CDATA[Blueberry Cake]]></Description>
        <PricePerUnit>0.55</PricePerUnit>
        <Batter>Blueberry</Batter>
        <Topping><![CDATA[Maple]]></Topping>
        <Quantity>200</Quantity>
   </Item>
   <Item>
        <ID><![CDATA[0003]]></ID>
        <Name>Raised</Name>
        <Description><![CDATA[Raised Glazed]]></Description>
        <PricePerUnit>0.55</PricePerUnit>
        <Batter>Regular</Batter>
        <Topping><![CDATA[Glazed]]></Topping>
        <Quantity>150</Quantity>
   </Item>
   <Item>
        <ID><![CDATA[0004]]></ID>
        <Name>Buttermilk</Name>
        <Description><![CDATA[Chocolate Buttermilk]]></Description>
        <PricePerUnit>1.55</PricePerUnit>
        <Batter>Chocolate</Batter>
        <Topping><![CDATA[]]></Topping>
        <Quantity>180</Quantity>
   </Item>
   <Item>
        <ID><![CDATA[0005]]></ID>
        <Name>Bar</Name>
        <Description><![CDATA[Chocolate Bar]]></Description>
        <PricePerUnit>0.75</PricePerUnit>
        <Batter>Regular</Batter>
        <Topping><![CDATA[Maple]]></Topping>
        <Quantity>100</Quantity>
   </Item>

In XSL file we have a CkecklistBox. We need to fetch all Item name from the Items.xml file. The default file for OptDialog.xsl file is OptDialog.xml file. We have to add two templates to display checklistbox with item names.

<xsl:key name=”XmlItem” match=”Identification” use=”Name”/>
  <xsl:variable name=”itemnames” select=”document(‘Items.xml’)” />
 <!– collect all catalog names for checklistbox –>
  <xsl:template match=”itemnames/Item/Name” name=”XmlItemref”>
    <xsl:variable name=”ItemName”>
 <!– fetch all item name and store into ItemName variable–>
    <xsl:variable name=”elemName” select=”$itemnames/Item/Name”/>
    <xsl:for-each select=”$elemName”>
      <xsl:value-of select=”.”/>,
    </xsl:for-each>
    </xsl:variable>
 <!– add checklistbox for display item name–>
    <div style=”background-color:white;height:200px;width:100px;font-family:Verdana; font-size:8pt;float:left;overflow-y:scroll;overflow-x:visible;position:relative;” name=”lstItemNames” id=”lstItemNames” OnClick=”JavaScript:getItemName();”>
      <xsl:attribute name=”scope”><![CDATA[report]]></xsl:attribute>
      <xsl:attribute name=”xpath”><![CDATA[//Item/Name]]></xsl:attribute>
  <!– call item-tokenize template to split items–>
      <xsl:call-template name=”item-tokenize”>
        <xsl:with-param name=”list” select=”$ItemName” />
        <xsl:with-param name=”delimiter” select=”‘,'”/>
      </xsl:call-template>
    </div>
  </xsl:template>

The item-tokenize tamplate:

<!– split string tokenizer Template –>
  <xsl:template name=”item-tokenize”>
    <xsl:param name=”list” />
    <xsl:param name=”delimiter” />
    <xsl:variable name=”newlist”>
      <xsl:choose>
        <xsl:when test=”contains($list, $delimiter)”>
          <xsl:value-of select=”normalize-space($list)” />
        </xsl:when>
        <xsl:otherwise>
          <xsl:value-of select=”concat( normalize-space($list), $delimiter )”/>
        </xsl:otherwise>
      </xsl:choose>
    </xsl:variable>
    <xsl:variable name=”first” select=”substring-before($newlist, $delimiter)” />
    <xsl:variable name=”remaining” select=”substring-after($newlist, $delimiter)” />
    <xsl:element name=”newitem”>
      <INPUT NAME=”chkOptions” TYPE=”CHECKBOX”>
        <xsl:attribute name=’value’>
          <xsl:value-of select=”$first”/>
        </xsl:attribute>
      </INPUT>
      <xsl:value-of select=”$first”/>
    </xsl:element>
    <xsl:if test=”$remaining”>
      <xsl:call-template name=”item-tokenize”>
        <xsl:with-param name=”list” select=”$remaining” />
        <xsl:with-param name=”delimiter”>
          <xsl:value-of select=”$delimiter”/>
        </xsl:with-param>
      </xsl:call-template>
    </xsl:if>
  </xsl:template>

Now call the template into table to display the checklistbox:

<TABLE width=100%border=0cellpadding=5style=font-family:Verdana; font-size:8pt>

<TR>

<TD colspan=2“>

<xsl:call-template name=XmlItemref>

</xsl:call-template>

</TD>

</TR>

</TABLE>

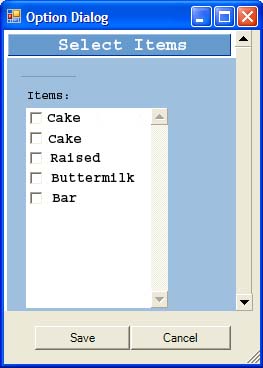
The output is given below:

Show message from string table in C#

1. Run Microsoft Visual Studio 2010 and create a new windows application(File->New->Project)

2. Select Windows FormsApplication and enter application Name into Name field “TestMessage”

3.  Add a button from Toolbox, enter ‘Show Message’ into Text property, ‘btnShowMessage’ into Name property

4. Double click on the button to go to the class file

5. Add tow reference:

using  System.Resources;

using System.Reflection;

6. Go to the design view and right click on the project solution name in solution view, select Add->New Item, select Resource File and click on ‘Add’ button. A file named ‘Resource1.resx’ will add to your project

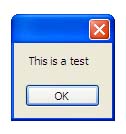
7. Double click on the resource file and enter “This is a test” into value field. default name field is String1. save the file

8. Add following code into Form1 class scope:

public partial class Form1 : Form
    {

        private static ResourceManager RM;
       
        public static void initialise()
        {
            Assembly assembly = Assembly.GetExecutingAssembly();
            RM = new ResourceManager(“TestMessage.Resource1”, assembly);
        }
        public static string Getstring(string key)
        {
            return RM.GetString(key);
        }

}

9. To initialize the file add following code into default constractor of the class:

public Form1()
        {
            InitializeComponent();
            initialise();

        }

10. Double click on the button and add the code:

private void btnShow_Click(object sender, EventArgs e)
        {
            MessageBox.Show(Getstring(“String1”));
        }

11. Compile and run the project, click on the button.It will display message from string table

XSLT(Extensible Stylesheet Language Transformation)


XSLT (Extensible Stylesheet Language Transformation) is a language for transforming XML document into XML, HTML, XHTML, or plain text documents. XSLT serves us many ways:
1. It is a general-purpose translation tool.  It convert from one XML markup vocabulary to another. XSLT transform an XML document into HTML or XHTML so it will easily display in a web browser.
2. It can recognize document content
3. It can generate multiple results from the same content-like HTML, SVG and WAP
4. It uses XPath for navigating XML documents. XPath helps XSLT identify and find nodes in XML documents. Nodes are things like elements, attributes, and other objects in XML.
5. It help us to perform complex sorting and linking easily.
XSLT will create a new XML document based on the content of existing xml file without changing it. It is most often used to convert xml data into web pages/PDF, between different xml schemas.  It is developed by World Wide Web Consortium(W3C). The latest version is 2.0.

In XML document the order of element is meaningful but the order of attribute is not meaningful, comments are same as html comment, CDATA sections often used to ‘markup’ into an element. Like –

<Name><![CDATA[John Smith]]></Name>

<City><![CDATA[Dhaka]]></City>
<State><![CDATA[Bangladesh]]></State>
<Country><![CDATA[Bangladesh]]></Country>
<Zip><![CDATA[1234]]></Zip>

Default Rules of XSLT Processing:

  • Document node: xsl:apply-templates
  • Element nodes: xsl:apply-templates
  • Text nodes: output text

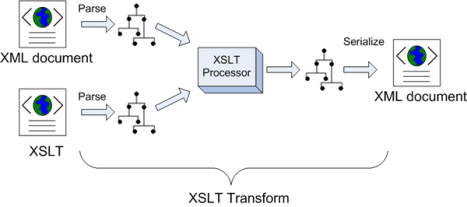
From Architectural Point of View:

  • XML Parser – An XML Parser is the component that interprets the XML code. Codes cannot be understood without a parser. An XML parser provides vital information to the program on how to read the file. Parsers come in multiple formats and styles. They can be free-standing software, libraries, modules and classes. All browsers have built-in XML parsers.
  • XSLT Processor – The software responsible for transforming source trees into result trees using an XSLT stylesheet is referred to as the processor.
  • Serialize – serialize the xml document for view the final output

How Does The Parser Work:

Parsers can be a bit complex. The goal is to transform XML into a readable code. Computer hardware only knows one language. It is the software that turns all the different languages into a workable format. Software is smart, but computers by themselves are ignorant. When presented with a bunch of XML code, computer hardware has no clue what it means. Parsers convert that code into something the hardware will recognize.

How XSLT Processor Work:

  1. Loads the input document as a DOM tree (internally the processor optimizes DOM)
  2. Performs a depth-first walk of the input tree
  3. As it walks through the document, selects a template in the stylesheet for the current node
  4. Applies the template, which describes how to create zero, one, or more nodes in the output tree
  5. When the walk is completed, creates a new tree (the output tree) from the input tree and the rules in the templates
  6. Writes the output tree according to the HTML or XML syntax

How Does Serialize The Result:

After your application has evaluated an XPath or XQuery expression or performed a transformation with an XSLT stylesheet, you might want to write the output as an actual XML document represented as a file or as a Java™ string. The process of rendering results as an XML document is known as serialization.

Procedure

  • Serialize an XSequenceCursor.

    Your application can call the XSequenceCursor.exportSequence method to serialize a sequence that is represented by an instance of the XSequenceCursor interface. The arguments on this method are an instance of the javax.xml.transform.Result interface and optionally an instance of the XOutputParameters interface.

    If the instance of the Result interface is also an instance of the javax.xml.transform.stream.StreamResult class, the sequence is serialized as described in the XSLT 2.0 and XQuery 1.0 Serialization Recommendation. The StreamResult object can contain an instance of the java.io.Writer class or the java.io.OutputStream class, where the processor will write the serialized sequence.

    You can create an instance of the XOutputParameters interface by calling XFactory.newOutputParameters() and call the methods on that object to override the default serialization parameter settings.

    XFactory factory = XFactory.newInstance();
    XPathExecutable expr = factory.prepareXPath("/purchaseOrder/item[@price > 1000]");
    XSequenceCursor exprResult = expr.execute(new StreamSource(inputFile));
    
    System.out.println("Items purchased costing more than $1000");
    if (exprResult != null) {
        // Set indenting in order to pretty-print result
        XOutputParameters params = factory.newOutputParameters();
        params.setIndent(true);
        exprResult.exportSequence(new StreamResult(System.out), params);
    } else {
        System.out.println("None found");
    }

    You can also call one of the getOutputParameters() methods on an instance of the XSLTExecutable interface to get the serialization parameters that are associated with a particular output definitionin an XSLT stylesheet. Use the XSLTExecutable.getOutputParameters(javax.xml.namespace.QName) method to get the serialization parameters for a named output definition or the no-argument XSLTExecutable.getOutputParameters() method to get those of the unnamed output definition. You might want do this to perform some post-processing on the result of the transformation using the instance of the XSequenceCursor interface that the transformation produces before serializing the result. If you change the settings of the serialization parameters in the instance of the XOutputParameters interface returned by one of the XSLTExecutable.getOutputParameters() methods, it will not affect the output definition in the stylesheet.

    XFactory factory = XFactory.newInstance();
    XSLTExecutable style = factory.prepareXSLT(new StreamSource("style.xsl"));
    XSequenceCursor xformResult = style.execute(new StreamSource("purchase.xml");
    
    XOutputParameters params = style.getOutputParameters(new QName("my-output-definition"));
    params.setMethod(XOutputParameters.METHOD_XHTML);
    xformResult.exportSequence(new StreamResult("output.html"), params);

    Note that according to the XSLT 2.0 and XQuery 1.0 Serialization Recommendation, a serialization error results if the sequence that is to be serialized contains attribute nodes or namespace nodes. If the sequence that you need to serialize might contain attribute or namespace nodes, get the values of those nodes as strings or some other appropriate type and serialize those values instead.

  • Serialize a single item.

    You can also serialize just the current item in an instance of the XSequenceCursor interface by using one of the exportItem methods. The exportItem methods are inherited from the XItemView interface, so they can be called on an instance of that interface as well.

    As with the exportSequence method described above, the arguments of the exportItem method are an instance of the javax.xml.transform.Result interface and optionally an instance of the XOutputParameters interface. The effect of calling exportItem is identical to the effect of calling exportSequence with a sequence that consists of just the current item.

  • Serialize the result of a transformation or query directly.

    Your application can also serialize the result of an XSLT transformation or XQuery expression directly by supplying an instance of the javax.xml.transform.Result interface on the XSLTExecutable.execute method or XQueryExecutable.execute method. The serialization parameter settings are determined by the attributes of any applicable xsl:output declaration or xsl:result-document instruction in the case of an XSLT stylesheet, and are always the default values in the case of the result of an XQuery expression.

    XFactory factory = XFactory.newInstance();
    XSLTExecutable style = factory.prepareXSLT(new StreamSource("style.xsl"));
    style.execute(new StreamSource("purchase.xml"),
                  new StreamResult("output.xml"));

    If your application supplies an instance of the XResultResolver interface on a transformation, your application can direct each final result tree to a different destination.

  • Use identity transformation.

    You can use the XML API to transform XML data contained in an instance of javax.xml.transform.Source directly to an instance of a javax.xml.transform.Result. This is often referred to as an identity transformation. See Performing basic XSLT operations for an example.

You can also serialize your objects into XML and then apply to the transform XML Object Serializer to XSLT Transformer .

Resources:

1. XSL Transformations (XSLT) Version 2.0
2. Serializing the results
3. How an XSLT processor works
4. CSCI E-153, Web Development Using XML

How can you develop reports with Active Report 6

Active Report 6 is a reporting tool for Silverlight, Windows forms and ASP.NET that will help you to make reports easier and faster.  It gives newbies the confidance they need to create simple reports without spending unproductive, ramp-up hours. ActiveReports leverages the latest technologies including ActiveX, XML, ActiveScripting and CSS to provide you with full integration, open architecture, and a user-friendly interface. These include upgrade tools, MS Access and other report converters, the Visual Studio report designer, the end-user report designer, charts, bar codes, export plug-ins and the .NET reporting SDK. The “End user designer” allows end users to edit reports, save and load report layouts. It allows you to monitor and control the design environment and customize the report’s look and feel to meet the needs of your end users. 

Installation:

  • Select RUN from the Windows Start Menu.
  • Type <setup file path>\SETUP.EXE.
  • Click OK or press Enter to run the installation program.
  • When prompted, enter your name, organization and serial number.
  • Read the license agreement.
  • Select your installation directory or accept the suggested default directory.
  • Select the directory for the dll and ocx installation or accept the suggested default.
  • Select the components you wish to install.
  • Type the name of the program group or keep the default value.
  • Click Next to proceed with the installation.
  • The installation program copies all of the selected ActiveReports components to the specified directory and registers the control and DLLs in your system registry.
  • You are now ready to use ActiveReports 2.

You also use End user designer  which required some dll files and exe file will need to be placed under the same folder.

ActiveReports.Chart.dll, ActiveReports.CodeDomSerializer6.dll, ActiveReports.Design6.dll, ActiveReports.Document.dll, ActiveReports.Interop.dll,
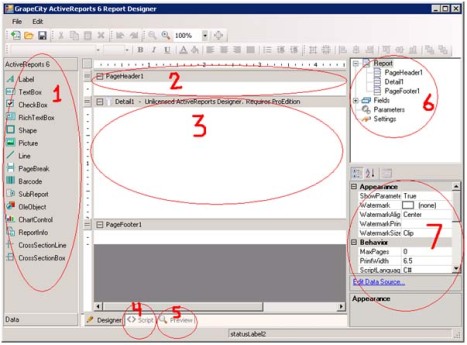
ActiveReports.Viewer6.dll, ActiveReports6.dll and EndUserDesigner.exe files. Double click the End user designer.exe file. The following Interface will open:

1. This is the list of controls available to the report design.

2. This is page header section which is displayed at the beginning of each report page. You can also add Report Section and Group sections. The Report section is displayed once at the beginning of the report. The Group sections are the ones used to regroup details as separate lists.

3. The Detail section corresponds to the position of the recordset pattern specified in the OLEDB, SQLDB or XML Data Source of the report.

4. This tab represents the code that the current RPX report design can execute. You can use VB script or C# script, set in the properties list of the report.

5. The Preview tab display the report output view.

6. This is the data information.  It gives the possibilities to add directly fields to the report (2-3) designer.  It gives also the access to the report general settings.

7.  List of all the available properties of the current selection.

Now I describe how we design a new report using XML file as datasource.  We use Inventory.xml file as datasource to design the sample report.

* Launch the End-User-Designer and click on the ‘File’ menu and select the New option or the ‘New’ icon from the toolbar.   

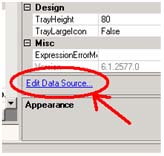
* Set the datasource: Select the Report node in the upper right control panel of the End-User Designer. This selection will assign the report properties of the report. Just below this list of properties, you will have access to a new link ‘Edit Data Source’.


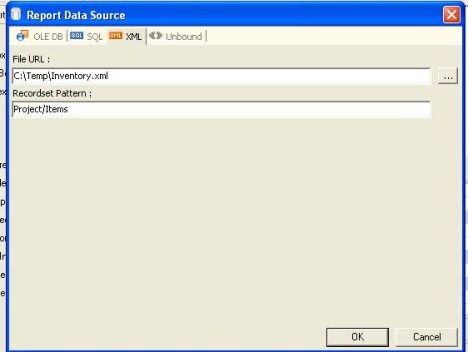
Click on the link will prompt a dialog with datasource information as follows:

Now by clicking on the ‘Report’ on upper right box you can see ‘Field’ node. While expanding the node with click on the + sign you can access all required fields which you use to design the report. Just drag and drop the field into report section and click ‘Preview’ tab. You can see the report data.  All the Group sections can have an Xml Path assign to indicate at which data change they need to be displayed.  This Xml pattern can be found in the section property named “DataField”.

You have to set the report path from which the main report will get all sub reports to display. Take a textbox from toolbar and named it as ‘RptPath’. Now into its text property enter your report folder path like – “D:\WorkArea\Reports\Items”. Save the file as ‘MainItems.rpx’.

There are mandatory fields or values that need to be set for the report.  we discuss it later.

Install Mac OS X Leopard 10.5.7 on PC Duel Boot Windows XP/ 7

You are a Windows XP/ Vista/ 7 user. Have to install Mac OS X in your machine. There is an easy way to install it with duel boot. There are different types of OSX86 Project available like – iPC, iATKOS, Kalyway, iDeneb etc. I use iDeneb which is a Mac OSX Leopard relase modified by Layne and iHackintosh Team, to run on non-Apple computers. This universal relase can run both on Intel and AMD based machines. The current version, iDeneb v1.3 10.5.7, has EFI support, but it can’t boot on old macines due the less of Non-EFI boot. This drawback has been worked out with Chameleon bootloader, that can install also on SSE2 computers. You should check Hardware Compatibility List (HCL) on OSX86 wiki.

Requirements

* Win XP/7 is already installed
* Free partition (for Mac OSX)
* iDeneb DVD/CD
* OSX86 Tools
* An existing Mac (for preparing the USB/DVD)
* Mac OSX distribution (iATKOS, iDeneb, Jas, etc) (Disclaimer: This is for experimental purposes, if you like the OS, please buy your own Mac OSX!)
* EasyBCD
* TabletMagic (if you want the tablet feature)

Steps to Install are given below:
1. Download OSx86 10.5.x

Go to your favorite torrent site and Download 10.5.x of your favorite flavor among the listed ones. Latest version is 10.5.7. Though 10.5.6 is also a fair deal. Burn the downloaded “.ISO” file to DVD using PowerISO / MagicISO or any other burning software.

2. Create Partition, preparing Disk

In windows XP, 7 or vista, Right click My computer > Manage, click Disk Management. Here create a primary partition with minimum 8GB space, though recommended is 15GB. As I have 500GB HardDisk I create partition with 100GB for each OS. There is no need to format this partition. After Partition is created, right click > Mark Partition as Active.

Burn the OSX86 ISO that you downloaded from torrents on to a DVD and reboot with Boot from DVD. Now you should see Darwin load screen.

3. Booting and starting Installation

As countdown from 10 starts, press F8 key and you will be able to have some more option’s. Now type -v and press enter now entered in VERBOSE mode, this will enable you to see any errors if they occur. In case your screen freezes for more than 10 minutes than note last lines and google them to find out a solution for your problem. If every thing goes fine after 15-30 minutes installation screen appear’s hold your breath we are not quit yet here.

Alternatively, to skip the booting errors, you can try these parameters on Boot: prompt

-cpus=1, -cpus=2.

4. Configuring Installation
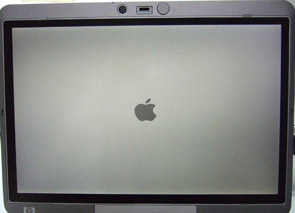

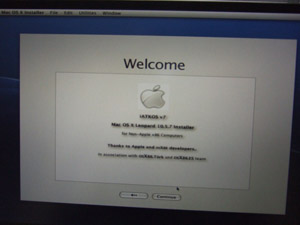
After boot, you enter the Graphical interface and you should be able to see a top menu.
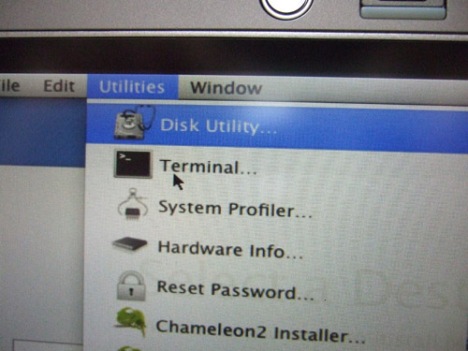
From the menu Click Utilities > Disk Utility.
Here, select the destination drive where you want to install Mac OSX.
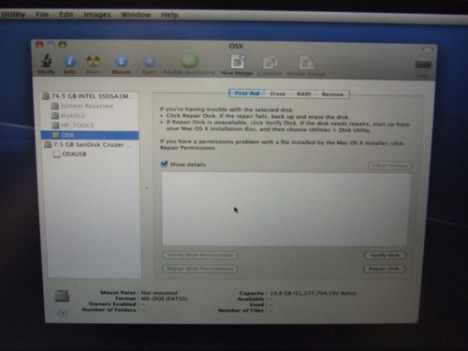
This will be the same partition we created earlier in step 1.

Now click on ERASE on right hand side and under the format option select “MAC OSX Journaled Extended”, give a name and then click Erase.

The disk will be erased and mounted. Close the disk utility and agree to the terms and conditions, then select the partition which you erased recently.
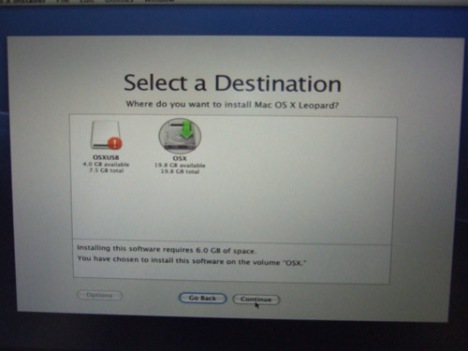
When you reach the Installation Summary Screen, Click on Customize button
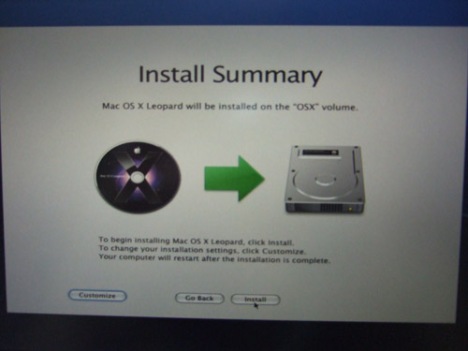
5. Customize the Install

The most important part is this step. Now, choose wisely what all components you need to support your running hardware. Browse at http://wiki.osx86project.org/wiki/index.php/Main_Page Navigate to the HARDWARE section and choose your version(10.5.x) and computer type (Portable/Desktop). This page should give sample hardware examples that people have tested, and modules they have selected.

If you have doubts, you can check the Insanelymac.com forums.

For most of the INTEL based systems Vanilla Kernel works very smoothly & for AMD system try Voodoo kernel. It is recommended to remove all the extra unnecessary languages as they take up about 2 gigs. Also, dont add extra Drivers (.KEXTS) which might cause conflicts. e.g. if You have NVIDIA geforce on your laptop, you should select NVDarwin from the “Graphics” section, not all.

Example:
You will need to select a couple of things:-X86 Patches – > OHR-Driver -> System->USB-Driver -> System->Sound->Voodoo HDA driver-Driver -> System->PS/2 mouse/keyboard->Apple PS/2 driver-Driver -> System->Laptop battery-Driver(for laptop) -> System->NTFS-3G-Network ->Wired->Intel(DO NOT check -Network ->Wireless)

After done Hit Ok.

6. Checking the disk and Installation of System files

Now your disk(DVD) will be checked for consistency, then, installation begins. It will take 20-45 minutes as per your hardware juice. After the installation is over, it will ask for a reboot. Remove the DVD after it has rebooted.

You should be able to automatically boot into OS X at this time.

7. Setting up the Boot Loader

Now that OS X is all working, we have to make the previous installation of Windows XP, 7 or Vista to work.  For this, I`ll  use Chameleon boot loader built-in to OS X. Restart the PC and install it.

You can use the Windows boot loader rather than chameleon boot loader. This helps you prevent re-fixing MAC OS installation when you re-install windows at some time in future.Put in your windows 7 or Vista disk, and boot from it. When installation starts, it prompts for “Recovery”. Select the recovery option. On you will be prompted to choose tools available for recovery. Select “command-line”.

DISKPART> list disk // displays the available HDD
DISKPART> select disk n // select the disk which has windows installation
DISKPART> list partition // list partitions on the selected disk
DISKPART> select partition n // select the partition number where windows was previously installed.
DISKPART> active //sets partition active
DISKPART> exit

REBOOT.

Now your xp/vista /windows 7 should boot, If it doesn’t try this:

Boot with installation disk into windows setup, choose recovery again, and select automated recovery of boot area. Windows should fix the boot automatically, then click Fix and reboot button.

8. Adding MAC to the Boot menu via Windows:

Boot into windows normally and download EasyBCD from google. Open it, click “Add/Remove entries” navigate to “Mac”. Select Type in the dropdown to “Generic x86 Pc” and give some name in the text box below. This name will appear in your boot screen. Click “SAVE” when done and REBOOT.

Now you should be able to boot into both MAC OS X Leopard and Windows.

Now enjoy the wonderful world of MAC!

Tips for Mac user to capture screenshot

How many ways you can capture your screen using Mac OS X:
1.Command-Shift-3 allow u to capture the enter desktop as a PNG file on your desktop.
2.Command-Control-Shift-3 help you to copy the enter desktop screenshot placed on clipboard to paste into another program.
3. Command-Shift-4 allow you to capture screenshot of selected area.A cross-hair cursor will appear and you can click and drag to select the area you wish to capture.
4.To capture a specific application window, press Command-Shift-4, then press the Spacebar. The cursor will change to a camera, and you can move it around the screen. As you move the cursor over an application window, the window will be highlighted. The entire window does not need to be visible for you to capture it. When you have the cursor over a window you want to capture, just click the mouse button and the screen shot will be saved as a PNG file on your desktop. (The file is saved as PDF in Mac OS 10.3 and earlier.)
5. Add Control to the two shortcuts above to place the screen shot on the clipboard instead of saving it to the desktop.
6. Another method for capturing screen shots in Mac OS X is by using the bundled Apple utility, Grab, located in the Applications > Utilities folder. Grab is useful if you need to include a cursor or a menu in your screen shot, or if you want to save your screen shot to TIFF format. To include a cursor, first go to Grab Preferences and select the cursor icon you wish to have in your screen shot. To capture the screen with Grab, run Grab, then choose of the capture modes from the “Capture” menu: Selection, Window, Screen, Timed Screen.
7. When you choose the Selection mode in Grab, you can capture a specific region of the screen by dragging around it. Grab will display a tooltip showing the size of the region you have selected and the screen shot will open in a window when you release the mouse button. The cursor will not be included.
8. When you choose the Window mode in Grab, an instruction window will appear asking you to select the window you wish to capture, then click the “Choose Window” button. When you click the button, the instructions will disappear and the window you click ill be captured, including the mouse cursor at the position where you click (if a cursor was selected in Preferences).
9. When you choose the Screen mode in Grab, an instruction window will appear asking you to click the screen when you are ready to capture. The mouse cursor will be included in your screen shot at the position where you click (if a cursor was selected in Preferences).
10. When you choose the Timed Screen mode in Grab, an instruction window will appear, allowing you to prepare your screen for capture. When you are ready, press the “Start Timer” button and you will have ten seconds before the screen is captured. This allows you to open menus and sub-menus, if necessary. After ten seconds the entire screen will be captured. The mouse cursor will be included in your screen shot if a cursor was selected in Preferences.

Use UNITY for develop high performance 3D game in iPhone

3D game development platform for iPhone

iPhone developers can develop high performance 3D game easily for the iphone OS 3.0. Unity Technologies, which makes 3D game development tools has high-end 3D game programming platform for the iPhone /iPod Touch. Developers can download  Unity iPhone 1.5.1 from http://unity3d.com/ and install the setup. Also read their online documentation and start working.Over 325 games are already shipped.

Add a System Framework in iphone sdk project

To add a system framework like OpenAl.framework in your project follow the steps:
1. Go to Project menu->Add to project->now select framework.
2. framework path is:
System->developer->platform->iPhone Simulator->developer->SDKs-> iPhoneSimulator 2.2 sdk->System->Library->Frameworks
3. select OpenAL.framework and click Add button
4. again click Add button to add the framework in your project.